After months of lockdowns, it’s finally time to get back outside and into a boot camp session. And with summer right around the corner, there’s never been a better time to get strong while enjoying the sunshine and fresh air.
Typically known for its high intensity, circuit style and group atmosphere, boot camps are a great way to train with your mates in a competitive, challenging and fun environment.
Using common boot camp tools like sandbags, kettlebells and dead balls, we’re going to show you five exercises that will help you build some strength and power from top to toe.
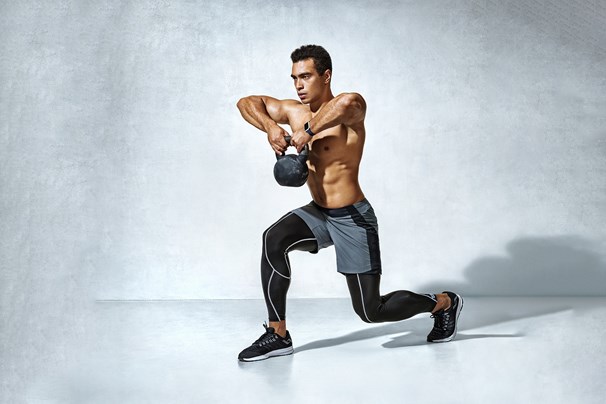
Exercise 1 – Kettlebell (KB) Front-Rack Split Squat
Take your standard split squat (think a lunge but both feet stay fixed to the floor), add a couple of kettlebells, hoist them to your collar and you’ve got an amazing total body strength builder.
To find your ideal position, start by stepping one leg backward and dropping that knee to the floor. Both knees should be bent at a rough 90-degree angle.
Now grab a set of KB’s and clean them to the front-rack position. The front-rack position is where the weight is held at your collarbone and elbows are pulled tight against your torso throughout the movement. Once in the front-rack and you’ve braced with a deep breath in, you can begin bending at the front knee whilst lowering the back knee to the floor.
The movement back upward is generated from the front leg. The back leg is still active, but the drive should come from the front.
Think “elevator, not escalator” by keeping the torso upright as you push upward. Holding the KB’s at your shoulders forces you to brace your midsection and shoulder girdle, demanding trunk stability while your legs do the movement.
By splitting your stance, you’re loading the lower body and pelvis differently to a bilateral (both feet shoulder-width apart) squat. This bias helps you develop more unilateral (single-sided) strength, which has been shown to produce similar muscle activation in lower body muscles whilst placing lower loads on the spine when compared to bilateral squats (2018, Eliasson et al.).
Exercise 2 – Sandbag Staggered Stance Romanian Deadlift (RDL)
After nailing your quads with the split squat, you’re going to want to balance things out by hitting the hamstrings and glutes.
Using similar loading principles as the Split Squat, the Staggered Stance RDL promotes greater stress to the single side of the lead leg, providing a great alternative when you don’t have barbells and tons of plates available.
Holding a sandbag, or any weighted object, at your front with arms extended, move one foot backward so the balls of the foot align with the heel of the front foot. Now you should have one foot slightly behind the other, which will stay here throughout each rep of the exercise.
With a slight bend in the knees, hinge at the hips until the sandbag is below the knees.
There should be a slight rotation of your back, where the opposite shoulder is pointing to the foot that’s in front. This will create a notable stretch in the hamstrings and glutes.
From the bottom of the movement, drive the hips forward by squeezing the glutes hard. It won’t take a lot of weight to truly feel each rep.
Exercise 3 – Kettlebell (KB) Clean & Press
The KB Clean and Press is a variation to the classic Olympic Weightlifting movement, the Clean and Jerk. This full-body exercise will build explosive strength for your lower body and put caps on your shoulders. Win-win.
Start with your feet shoulder width apart and a KB positioned between your legs. Hinging at the hips, grab the KB handle with an overhand grip and straight arm. With some tension in your lats (the large muscles on the side of your back), push your feet into the floor and push your hips forward.
As you move upward with the KB, shrug the loaded shoulder and rotate the wrist so the thumb gripping the bell rotates to be pointing toward your face. The KB should now be in the perfect place to catch it in the front-rack position.
Once stable in the front rack, brace the midsection by taking a deep breath and press the bell overhead. Make sure to fully extend your arm, keeping your bicep aligned with your ear and your wrist rotated so your forearm separates you and the bell. This will make sure no bells fall on heads if the grip loosens. Slowly lower the bell back to the front-rack position before hinging it back to the ground and repeating.
For those who’ve gone a little too heavy or maybe looking to add more lower body to the movement, a push-press variation to get the bell overhead can help.
Exercise 4 – Dead Ball Clean and Slam
Another variation to the Olympic Clean, the dead ball Clean and Slam is a posterior chain power punch. Your posterior chain is the muscles on the back side of the body, specifically the latissimus dorsi (aka lats, as mentioned above), erectors, glutes, hamstrings and calves.
Similar to the starting position to the KB Clean, your feet should be shoulder width apart and the dead ball between your feet. Hinging at the hips before squatting down, grab the ball with both hands and pull it toward you. Drive your feet through the floor, extend your hips and bring the ball overhead with intent.
Decelerate the ball so it’s directly overhead just enough to ensure you’ve got control, then aggressively slam the ball into the ground. This is important to note. Maximal intent has been shown to improve your ability to produce power through each rep, regardless of the weight you’re moving, so slam that ball hard.
Return to the starting position by stepping over the top of the ball and repeat for stated reps.
It’s recommended that prior to starting you check the surface you’re slamming to. Sand and grass are recommended over concrete or bitumen.
Exercise 5 – Kettlebell (KB) Renegade Row with Push-up
Hitting the two remaining movement patterns for the upper body, the Renegade Row with an added Push-up is an all-in-one for the chest and back.
Start in the plank position with arms extended and heavy KB’s in hand. Tuck your pelvis by squeezing your glutes to create tension in the midsection and lower into a push-up. Lower until you reach a deep stretch in your chest before driving the hands through the weights, pushing you upward. Once back at the top, row one KB upward until the handle meets your ribs. Slowly lower before repeating on the other side.
As the reps progress, the ability to maintain good posture through the spine and midsection will be heavily challenged. This will present itself through rotation of the hips and back during each row. Once you notice that you can’t control this anymore, stop the set, rest, then go again.
For the more advanced, slow the lowering-to-ground portion of the push-up down to 4-5 seconds or elevate the feet to parallel. This will add further stress to the chest making each rep that much more of a mental battle.
It is time to move away from the half-botched burpees and never-ending laps of the field and start building full body, functional strength. With these movements, you’ll finish your sessions knowing you’ve challenged yourself and your mates whilst building a foundation to crush whatever life throws at you. Get outdoors, lift something heavy and have a great time doing it.
Jess Hunter is a coach at the Australian Institute of Fitness.


